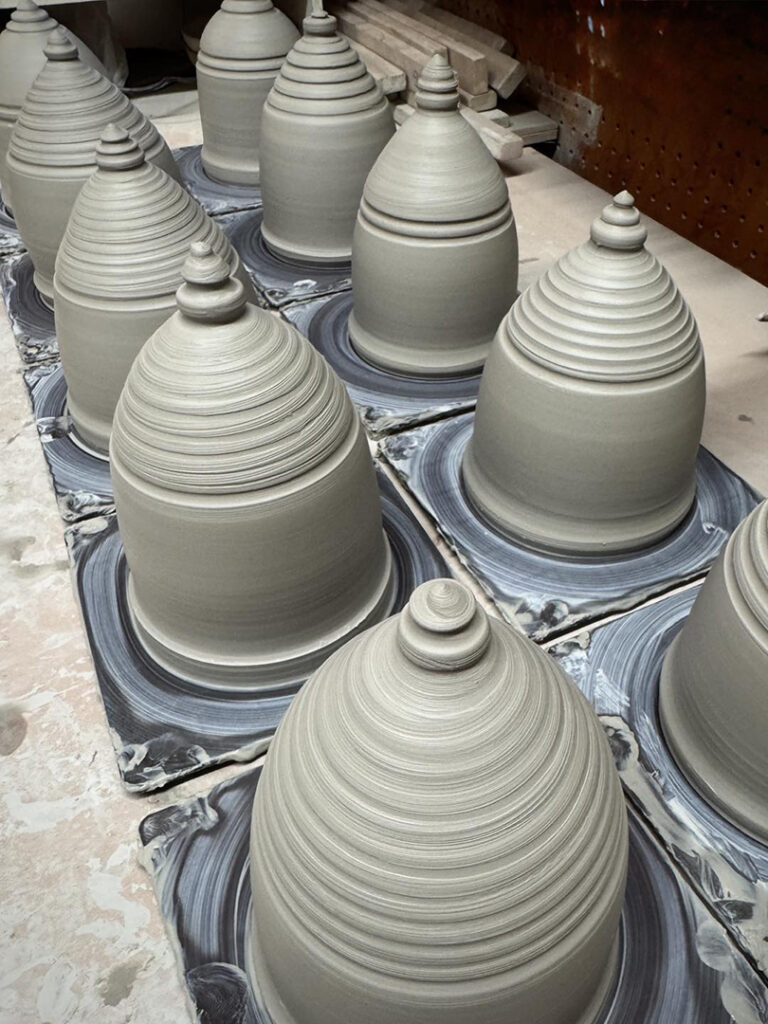
Gary Jackson: Fire When Ready Pottery
A Chicago potter’s somewhat slanted view of clay & play
Categories: process, production, stamps

So now that I have a “few” mugs built and ready to bisque, this weekend I started
working on making new bowls for my upcoming kiln. So I threw some last night,
more today… and luckily, was able to start stamping today! If all goes well, I will
be able to finish stamping tomorrow and get them all trimmed as well. I know it’s
quick, but I’m hoping to get them into my Tuesday night bisque kiln!

And now for a quick glimpse at the tools of the trade!
A couple toolboxes full of handmade stamps and my trusty Shimpo banding wheel.
My first pottery gift from my parents when I started getting “serious” about clay!

Categories: pottery, production, studio

You know I love making mugs!
And tonight I finally finished adding handles, painting some colored slip accents and
setting them out to dry. Half of them are made of soda stoneware, the other half B-Clay.
All of them are set to be fired in my upcoming soda kiln. The B-Clay works especially well
in the back stack of the kiln, whereas the soda clay turns out better with a little heavier
coverage of soda glaze build-up. So I need to keep track of which is which… okay…
so there’s a small “code” on the bottom of each piece to help with that.

So now they’re drying… waiting to go into my next bisque kiln on Tuesday.
Forty-four of them… just in case you’re counting! Then they’ll be glazed and soda fired
just in time for my upcoming Holiday Home Show!

Categories: pottery, process, production, studio

So last week, we worked on ovals in my Tuesday night class.
One of my brand new students had seen my ovals here on the blog, and asked if we could
cover how to make them in class. So I said sure, even though “brand new beginners”
don’t generally get to make ovals. But then again, after the demo… Jen has been all over
the ovals and has already made a couple of them!

Since then, I’ve been all over the ovals in my studio as well.
And when I dive into production mode, I have a tendency to go a little overboard. I may
have done that again here… as I’ve run out of space in my studio because of the ovals!!!

Since the demo was so “inspiring” to Jen… I thought I’d cover a bit of them here too.
So when I start making my ovals, I generally throw a large bottomless cylinder on a bat.
For these ovals, I also made split rims while I was throwing them so I would have a little more
to play with later when stamping & decorating. Once the cylinders have lost their “shine”
and stickiness, I wire them off the bat, pick them up carefully and manipulate them into the
oval shape. I let them set up even more, do some stamping, some pinching, some fluting…
you know, more of my usual decorating tricks!

The next step is to add a bottom onto the bottomless “now-ovaled” cylinders. So I throw out
a slab of clay large enough to fit the oval. Then I carefully pick up the oval, set it on the slab
and trace the shape. Then I take it off, flip it over and score & slip both pieces. Carefully
putting them back together and “squishing” them carefully so they stick! Since I was tired
and running out of time, I wrapped them up and let them sit like that overnight.

The next day, I came in and worked to clean-up the bottoms and edges. So I flipped the
combined form together and trimmed off the extra clay with my firm green rib. Carefully
scraping off the excess clay – trying to combine top & bottom seamlessly.

Then I take a flat sided paddle to compress the edges together  – making sure the
connection is strong, as well as creating a nice corner-angle-undercut all the way around.

Once the bottom is attached, trimmed and smoothed into place, I carefully flip it
back over and decide if it needs handles – and this time the answer was yes!

So I rolled out coils of clay and textured them with a grooved rod that I found at a flea market.
I think it’s a piece from Lincoln Logs or some other kid’s game?! Hey, but it works great!
So I press the textured rod into the coils to get the textured, then bend them into the handle
shape. I always do both handles at the same time so that they match.

Then, it’s more scoring & slipping to get the handles attached.
A few last minute touch-ups and then they were done for another night.

Special thanks to my studio neighbors Lisa Harris, Cathi Bouzide & Karen Patinkin
for letting me “borrow” some table space while I’ve been working on these…
many times without them even knowing it!

I wrapped them up in plastic for one last night. Hoping that the slower drying will give
all the parts a little more time to balance out and dry more evenly. Unfortunately, all these
ovals are taking up a LOT of space in my already small studio. So much so…
that these ovals have been relegated to the floor!!! Careful where you walk…

After an evening of “slow drying” under plastic, they’ll be uncovered so they can dry the
rest of the way… and then go into my next bisque kiln scheduled for next Tuesday night!

Categories: process, production, studio

Tonight I finished adding handles to the first batch of new mugs.
Generally I keep the mugs with freshly attached handles under wraps
overnight before leaving them out to dry. In my mind, it helps keep the handles
“happy” by allowing the moisture levels to balance out between the drier cup
and the wetter handle. After they “even out” overnight, then I can open them up,
add a few slip details, and then let them dry fully… with happy handles!

Categories: pottery, process, production

After stamping batch number one, I opened a new bag of B-Clay
and threw another batch of mug cylinders. Tomorrow the stamping continues!

Categories: pottery, process, production

So the production cycle has begun again…
and by now you might realize that I typically start with my favorite… MUGS!!!
So while my pile of reclaim is settling in & drying up a bit, I broke into a fresh
bag of soda clay to make a new batch of cylinders… soon to become mugs!

Categories: art fair, glaze, kiln firing, process, production

So my day started out a little better today than yesterday.
Not quite as early. No kiln to unload. No rush to set things up when I got there.
Regardless… I was still a little tired after a late night of glazing & loading.

The fun continued today with more customers, more friends, more family.
And more chocolate shakes!!! Part of the “food court” area of the art fair
is this wonderful trailer from The Malt Shoppe. And over the years I have “trained”
them to make the best chocolate shakes ever! It starts with chocolate ice cream
and chocolate sauce. They mix it up into a shake, add more chocolate and mix again.
And then, just when they think it can’t get any chocolatey-er… I have them mix in
some hot fudge!!! I want the shake to be brown!. I want it to scream “chocolate”!!!
And over the years, they’ve been doing a great job… and this art fair was no exception!
Yesterday I only had one. But today I made up for lost time with three!!!
But who’s counting?!

At the end of the fair, it’s always an “adventure” to pack everything up and drive home.
Somehow even after selling a lot of pots all weekend long, it amazes me every time how
there’s not more empty space in the van?! Still packed. Still full. How does that happen?!

Yet again… after a full day at the art fair, then packing & shlepping it home…
it was back to the studio tonight for more glazing & kiln loading. There was and empty
shelf on the top of my back stack of the kiln. Plus, Corinne said that I could do another
layer or two on the front stack before she puts her sculptures in. So… despite my exhaustion,
I glazed more & loaded more. Until I couldn’t glaze no more…

Categories: kiln firing, process, production

Today was a very long day.
Not only did it start out very early unloading HOT monsters from the kiln.
And then a full day of chatting & selling pottery at the art fair. But that’s not it.
As if I had endless time, and endless energy… I also needed to go back to the
studio after the art fair to glaze and load part of another kiln! One of my fellow
studio mates is firing a kiln with her sculptural work in it on Tuesday. She offered
me some extra kiln space in her kiln… and you know how I love to fill a kiln!
Nothing pains me more than an “under-packed” kiln!!!

So I seized the moment… took on the opportunity… and pushed myself to work late
in the studio to glaze and pack the back stack of the cone 10 reduction kiln. Corinne
will be loading her work in the front of the kiln. And if all goes well, I’ll have some
new “replenishment” pieces just in time for “ART DETOUR.” Including some more
stamped bowls, tumblers and my new “line” of textured Relic Rattles!

Categories: art fair, kiln firing, process, production, seasons

So last night, I stopped by the studio after setting up my Barrington art fair booth.
I knew that my electric kiln full of monsters would still be warm from firing
overnight. And it was still just over 800-degrees. To hot to open… but I just had to!
So I cracked it open about a 1/4-inch with a thin shard. And went home for a quick sleep!

Then this morning, I stopped in on my was out to Barrington for the start of the fair.
When I got in, the kiln was still about 200-degrees hot. Warmer than I would like…
but I didn’t really ave any choice. I had to take them out. I had to take them to the fair.
So there I was, with a thick pair of gloves, carefully unloading another hot kiln!!!
Luckily, they all turned out great… so I pulled out, tried to cool them quickly so I could
pack them out without the foam sheets melting!!! Then it was off to the fair…
with a new collection of festive monsters in tow!

And the newest member in the tribe…

Categories: kiln firing, process, production

Okay, so it was another long night in the studio.
Frantically painting underglaze… and then spraying a layer of low-fire clear
glaze on them all. Glazing the insides… and bottoms… touch-ups… clean-ups…
Finally getting them all into the kiln around 11:30pm last night. A day late…

So right now… I’m exhausted but pleased that all my monsters are safely
packed away in the kiln firing. Although it’s going to be tight…
counting the hours until they will be fired, cooled and ready to unpack!
And there just aren’t enough hours between now and then…