09.03.2009
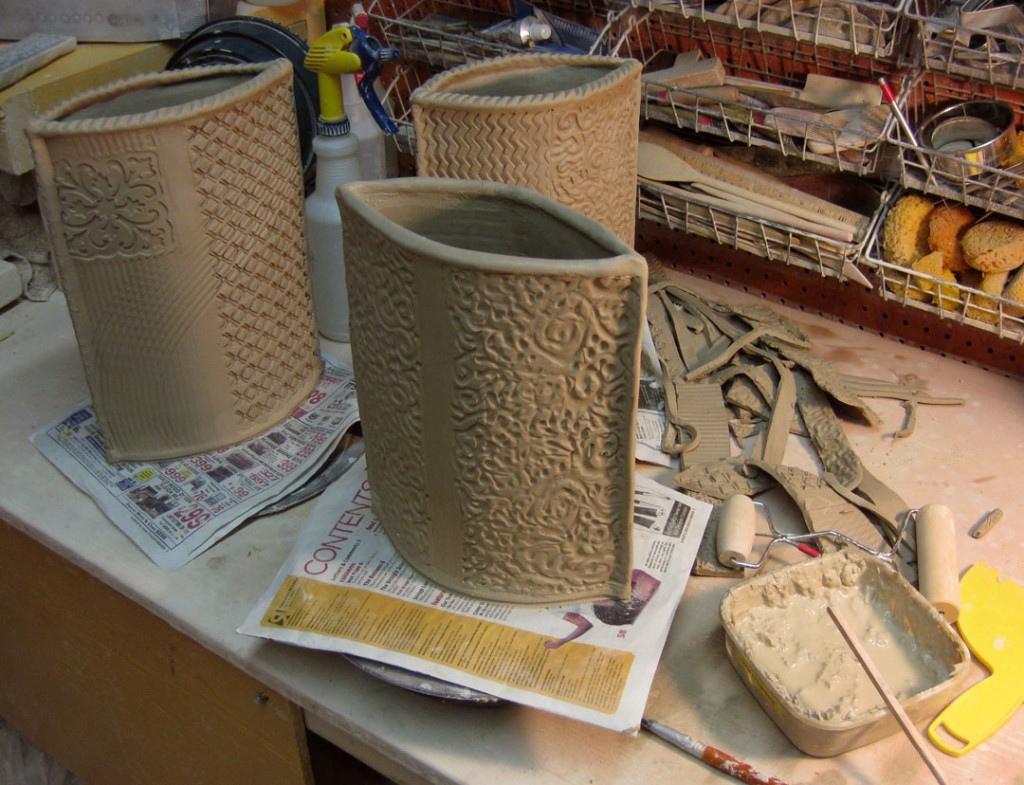
So I’ve spent the summer teaching kids how to make slabs… among other things!
We’ve thrown slabs by hand stretching the clay across the tables. Turning those
slabs into plates, cylinders, platters, birdhouses, vases… and even a totem pole!
But then I thought… why not make some slab pieces in MY studio?!
So I did…


I’d like to know how you were able to keep the envelope shape vase? Is there anything inside? Also, do you texture the vase before you put the walls together?
Thanks for your help. Wanting to do this with elementary students.
HEY CYNTHIA – I do this project all the time with my kids during Summer Camp. It’s surprisingly easy. First I have them throw a slab – no rolling pins allowed! Then they add the texture to the slabs while they set-up on the canvas table. I let them sit for a few minutes so they’ll hold their shape better. Then I score & slip the sides, and press them together. At this point, it’s okay of the two slabs are sitting flat on top of each other. Once the side seams are well-attached, the carefully stand it up and slide my hand down in between the two slabs to “open” it up. Once the envelope/pocket is opened, it should stand pretty well by itself. There is nothing inside to hold the shape – although you could. Then I add the slab bottom, then the rolled coil rim. I try to clean up my seams in the interior, as well as the exterior. If you have time, I typically keep them covered in plastic overnight so the moisture level can balance out a bit. Although we have “quick-dried” them with the kids.
Good luck. The kids will love the project. They can “express themselves” with their textures & pattern. And they’ll be surprised how quickly they can make a clay piece of a good size. So much quicker, cleaner & easier than pinch pots or coils!!!
Hey thanks for all the tips on how to make these. I’m so excited about trying them! I’ll be sure to keep them covered for a couple of days. Keep up the great work!
I tried these with my 4th and 5th grade afterschool program after spotting them on pinterest. I love the way they turned out. I challenged the kids to put three different textures on their vessels. Thanks so much for posting this for all to see
I’m so glad you actually made some “slab fun” with your students. I’d love to see the results. E-mail me some photos if you get a chance so I can post them here on my blog. It’s always so much fun to see how my little blog ramblings may have inspired someone else to make something… especially kids!!! Thanks – GARY
Send photos to : gary@firewhenreadypottery.com
Hi Gary, I just happened to be Pinterest surfing and came across your site/blog? I have to thank you for sharing your ideas! I may attempt this with my after school art program kids! It looks very cool!
LENA – Thanks for checking me out on Pinterest and then stopping by my blog! I’d love to see what kinds of slab-masterpieces YOUR kids make!!! E-mail me some photos if you get a chance. The biggest thing to remember is that they will only stand up and hold their shape if they have a little time to set-up first. So I make the slab, add the textures, cut the shapes and then let them sit for 10-15 minutes. I then do all of the scoring & slipping to be ready. And then very carefully put them together, stand them up, then “open” them up and create the final shape! Good luck – don’t rush ’em!!!