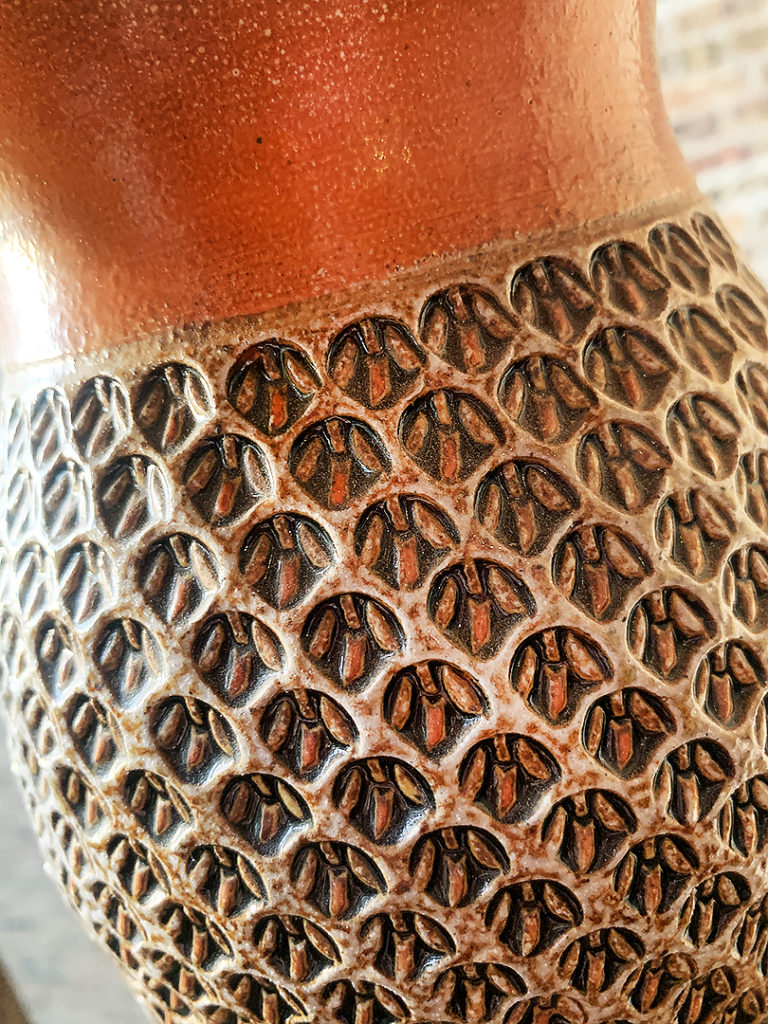
A simple single white rose…
nestled on top of a stamped & soda-fired ikebana vase.
Gary Jackson: Fire When Ready Pottery
A Chicago potter’s somewhat slanted view of clay & play |
A simple single white rose…
nestled on top of a stamped & soda-fired ikebana vase.
Greetings on our last day of Summer Camp this week… from this little “bonus†camper! More kids & more fun next week!!!
I mean, they asked what they could do… so I told them!
We have some of these clear acrylic dividers between some of the wheelthrowing workstations for social distancing. As with everything in the studio, they tend to get splattered with clay. So since they were looking for something to do… I figured what better project than giving them a quick wipe-down?! I’m sure it might not have been what they were hoping for… but they both did it willingly.. a little contest to see who did it better.
Well done Emily & Ruby! Thank you both!!!
Not bad for a day’s work!!! Today my Summer Campers made more pots… their third day of throwing on the wheel. Looks like they’re doing really well, learning quick, making pots & definitely having a lot of fun!!!
So I got this really nice message a couple days ago from one of my Instagram Followers. She has been doing a little “stamping” of her own… dabbling with the textured stamp addiction! It was so nice to hear from Lori and to see a few of her stamped pieces. Looks like she’s off to a great start. Keep up the good work Lori… remember, MORE IS MORE!!!
“You have been an inspiration for my own artwork and I have a few pieces of stamped work on them but need to post them up. I had a blast following your blog post for about 4 years while I had studied ceramics at Sul Ross State University. I even did a contemporary ceramic artist presentation about your stamped pot designs, the process of soda fire, and the Christmas ornaments you make.” – @loriyugen
And now we have handles… and therefore, now we have MUGS!!! One step closer to the bisque kiln! Another step closer to getting these done in time for next weekend’s art fair in Glenview!!!
More raindrops. More happy lilies. I’m getting a little tired of all this rain… but the plants outside sure are loving it!!!
With one big “commission” batch of mugs finally done… I’m already working on the next batch! You know how much I LOVE making mugs. I’m going to try to rush these through the process a bit to get them done in time for my next art fair… The Glenview Summer Art Fair in a week and a half! Fingers crossed…
Last night during my Beginning & Advanced Beginning Wheelthrowing class, we tackled making a bowl on purpose… instead of a cylinder gone bad. We discussed the differences… and how I can see if it started out as a cylinder… tsk-tsk!
After doing a demo on a basic bowl, I explained how the wheel pretty much makes the plain bowl for you… but it’s up to YOU to decorate it and make it your own! So I threw a bunch of basic bowls during class for us to “play with” later!
And then we re-grouped when I was done throwing all of the bowls. We then went through a quick barrage of tricks & techniques for doing some surface decorations to their bowls. None of them are too difficult. It’s more about encouraging them to give it a try, commit to something, having fun… and i fit doesn’t work, we can always squish it up, re-wedge it and try again. IT’S JUST CLAY!!!
Bowl #1 – The “Control” Sample… this is what they all started out like…
Bowl #2 – a simple fluted edge in four places
Bowl #3 – a simple flared-out flange
Bowl #4 – A wider flared flange… more “canvas” for decorating!
Bowl #5 – a split rim with two side dents…
good potential for a basket handle to go up & over the top
Bowl #6 – Another split rim – this time with four dents making kind of a quatrefoil squared-off effect
Bowl #7 – Another split rim… this time with eight finger-pinched sections
Bowl #8 – another split rim with eight dented sections… four inwards & four outwards – creating a bit of a lotus effect
Bowl #9 – Thick white slip with a tight spiral dragged through using the rounded end of my wooden knife.
Bowl #10 – Thick white slip with some concentric banding.
Bowl #11 – Thick white slip with loose fingsr-painting squiggles.
Bow #12 – Thick white slip with groovy squiggle pattern using the rounded end of my wooden knife.
Bowl #13 – Chattering…. rhythmic tapping of a rubber rib through the thick white slip while the bowl was spinning on the wheel.
Bowl #14 – Another bowl with chattering….
this time a bit more angular & linear in the center… by request.
Bowl #15 – An ombre blended gradation of black & white slips… then a fun spiral dragged through both.
So for now they’re all under plastic up in my studio. The class demo was a lot of fun for everyone… just trying to show off some tricks & techniques for decorating basic bowls! I will continue to “detail” them… and possibly do a little stamping in the days to come!
And I think we’ve all waited long enough. Like a deserted tropical island wouldn’t have been the best location to shelter-in-place through the pandemic?! They could have filmed several seasons by now… bring it on Jeff Probst!!!
Gary Jackson: Fire When Ready Pottery
Lillstreet Studios ∙ 4401 North Ravenswood, Chicago, Illinois 60640 ∙ 773-307-8664 gary@firewhenreadypottery.com |